In a previous article, I mentioned Adobe DNG as an archive strategy for preserving RAW files. Here, I'm going to spell out my step-by-step procedure for utilizing this tool. You'll need Adobe's DNG converter (it's a free download from their Web site). You will also have to make certain decisions about your existing proprietary RAW files but I'll get into that as we go along.
In case you are unfamiliar with the Adobe DNG converter, here's a brief explanation. DNG is an open-source (meaning publicly documented) program for preserving RAW files, unlike the proprietary files your camera creates. RAW files from any camera can be converted to this format and you can even embed the original proprietary file in case you want to extract that in the future. DNG also embeds the metadata. Proprietary RAW files generally create separate "sidecar" files for this which can get misplaced or lost. Additionally, you can set the DNG preferences to include a JPEG preview. That's very handy when perusing a bunch of RAW files anywhere on your computer other than in Bridge or Camera Raw. You can see what images those cryptic file names actually represent.
Do you need DNG now? Well, no. I consider DNG to be a hedge for the future and at present I am only saving certain important images in that format. I then burn them on MAM-A Gold CDs which are rated to last over 100 years.
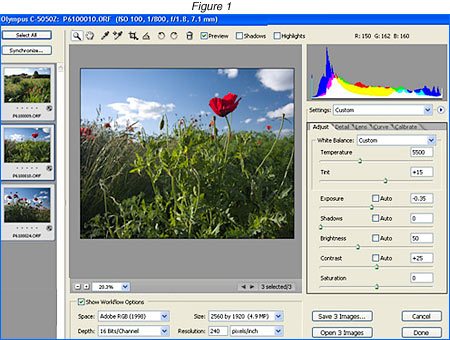
Ok, let's get to it. My first step is to create a separate folder on my hard drive for the DNG files. I use this as a temporary holding area until I can burn them on CDs, after which I delete them from the hard drive. Next I open the RAW files I want to convert in the Photoshop CS2 converter. A nice feature of CS2 is the option of opening several files at once in the converter and I select these in Bridge. Figure-1 shows three such images in the converter. Notice that the values visible under the Adjust tab are the same for each image. That's because I made the same adjustments for each image. Once I have done that, I am ready for the next step, which is to click on Save.
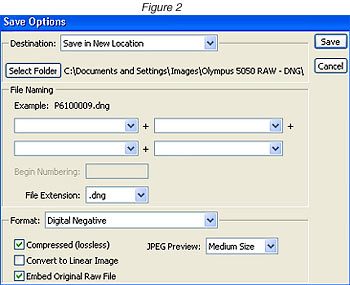
Figure-2 shows the Save Options window that then pops up. Here you can select where to put the conversions, change the file names (I prefer to keep the same file name as the original RAW) and some other preference choices. I check Compressed (you can see it's lossless and I see no reason not to check this), Embed Original RAW File (in case I want to extract it as some future date), and JPEG Preview: Medium Size. I leave the Convert to Linear Image box unchecked. I could always do THAT conversion at a later date, if necessary, but you can't do the reverse. The Format, of course, is Digital Negative which after all is the point of this exercise. You could also save the file as a Photoshop, TIFF, or JPEG but I don't see any reason to do that here.
My final step is to burn the DNG files I have created on the aforementioned CDs. After checking to make sure they are really on the disk and can be read, I put the disk away. The final step is to delete the DNG files from the folder I created on my hard drive.
The big advantage in doing this via Bridge and the RAW converter is the ability to select individual files. And that brings us to the Adobe DNG Converter. You can't select individual files in that, only folders. If you have a large number of RAW files in a folder like I do, you probably won't want to convert every single one. The solution to that limitation is simply to copy the files you do want to convert into a folder for that purpose.
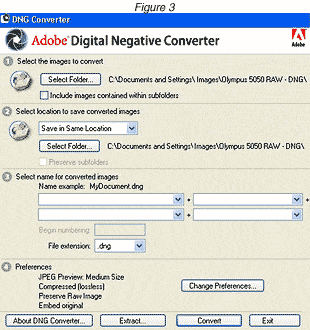
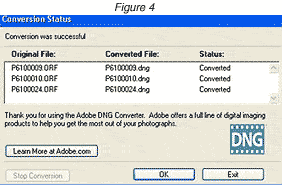
Figure-3 shows the Adobe DNG Converter and Figure-4 is the window that pops up when I use this tool to convert those three files. As you can see, you must first select the folder where the files you want to convert reside. Then you select the folder for the converted files. Again, there are no names in the converted images section I show here because I am using the original RAW file names. Below that are the Preferences I chose and if you click on the Change Preferences you get to a window with some brief explanations about those settings, just in case you are not sure what to choose. Otherwise, it's essentially the same as I outlined previously with Bridge and the CS2 converter. So why do you need the Adobe DNG Converter? Well, if you decided to embed the original RAW file, as I did, you need it should you want to extract it at some point. I don't know of any other tool that will accomplish that.

What happens when you choose Extract? The original RAW files are extracted (see Figure-5) and opened in the folder you select. You retain the DNG files. Pretty simple.
What about all those original RAW files on my computer? As I said earlier, I don't convert every RAW file I have. Just selected ones. Those I'm not currently using, I move to a second computer with a much larger hard drive than my main one. (Alternatively, you could copy the files to an external hard drive which you keep turned off except when using it.) I burn those RAW files on CDs too, the really valuable ones on Gold disks; others on regular Memorex disks. My PSD and TIFF files get the same treatment, by the way.
If all this sounds terribly redundant, it is and that's the point. Hard drives, CDs, and DVDs can get corrupted and become unreadable. I'm just trying to hedge my bets here. Of course, there's no guarantee that devices to read this media will be available in the future. Remember 5 1/2 inch floppy disks? Does anybody today have a machine to open those? The only advice I can offer is this: keep an eye on developments in the technology and if necessary, transfer the files on the old media onto the new.
What kind of software support is there for DNG, particularly for image editing? Well, at present that seems to be confined to Photoshop CS2, Photoshop CS, Photoshop Elements 3.0, and Photoshop Elements 4.0. I have no experience with Adobe Elements but let me offer a word of warning about Photoshop CS. The latest version of both the Camera RAW plug-in and the Adobe DNG Converter is 3.4. Those will not work with CS. If you are using CS, you must download and install version 2.4. However, I recommend that you upgrade to CS2. The enhanced features are well worth it.
What about camera support for DNG? As of this writing, there are four cameras that produce DNG as their RAW format: Hasselblad H2D, Leica Digital-Module-R (for the R8 and R9 SLRs), Ricoh GR Digital, and Samsung Pro 815. The latter two are high-end point-and-shoot models, not SLRs. I suspect that more cameras will be forthcoming IF manufacturers believe there is a future for DNG.
What about your original RAW files? I'm keeping all of mine, including those I embed in the DNG files I create. Why? Maybe it's paranoia. If a problem should develop with DNG, I'll have the original files separately. This sort of leads to the broader issue of digital files in general. Conserving film, whether negatives or transparencies, does not depend on software, disks, or anything relating to computers. Not that those media are indestructible. But at least you can see what you have. Not so with digital files, especially RAW. There is widespread concern about whether we'll even be able to read those files in the future. I think DNG can be part of the solution but there are no certain answers at the present time. It's your call.


