

On this page we offer a discussion of an important photographic concept that may improve your photographs. We will be covering a new topic every month, and hope that most of them will be relevant to your needs and helpful to you.

We recently covered the special steps for taking great photos of infants and toddlers, stressing that you should always keep in mind two factors:
- NYI's Three Guidelines for Great Photos; and
- The stages of the infant's development.
With children who are a little older (let's call them by the very technical term, "kids") we have different problems — and opportunities! Before we get into these, let's ask: When does an infant become a kid? Well, let's arbitrarily say, when they get out of diapers. When does a kid grow too old to be a kid? When they become teenagers! (This is more than a wry social comment. When it comes to photographing teenagers, you need a totally different set of skills.)
So our subject in this article is photographing kids, by which we mean children of about two through twelve.
The first point to remember is that you still must start with the NYI Three Guidelines. If you're not sure of them, check out the NYIP Photo articles on this site for a full presentation of these Guidelines.
In any case, the NYI Three Guidelines are very simple and obvious (at least, they're obvious once you know them!). Here they are, in brief.
As you look through your camera's viewfinder, ask yourself three questions:
- Guideline One: What's the subject of my photograph? In other words, what do I want this picture to be about?
- Guideline Two: How can I focus attention on that subject? In other words, how can I draw the eye of the viewer to my subject?
- Guideline Three: How can I simplify. In other words, how can I eliminate or camouflage anything that distracts from my subject?

Let's look at how the Three Guidelines work in this example of a picture of a kid on a carousel. Guideline One is "What's my subject?" Here, it's obviously this young happy girl on a carousel ride. Guideline Two asks, "How can I focus attention on my subject?" In this photo we made her large and up front in the frame, we have her charming eyes peering out at us, and we placed her in bright light. Guideline Three is "What can I do to simplify this picture and remove any elements that distract attention from her?" In this photo, we don't see much that can be removed. what about the pole in the foreground and the carousel horse in the background? We think they're part of the subject. This picture is not just about the girl. It's about the girl-on-the-carousel. So these elements add to the subject, they don't distract from it.
So much for the Three Guidelines.
While infants spend their days sleeping, sitting, or crawling, the young kid has moved on and is often in perpetual motion. Most important, he or she lives in a world filled with the joy of discovery and make-believe. These are the spirits you want your camera to capture.
What makes most kids special for the camera is they haven't learned to fear it yet. They're as natural in front of the lens as anywhere else. (By the way, this is why teenagers are different: They're usually very shy and self-conscious in front of the lens.)
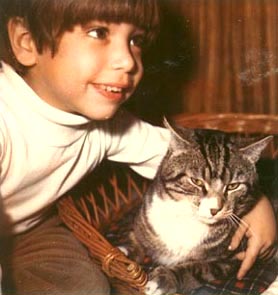
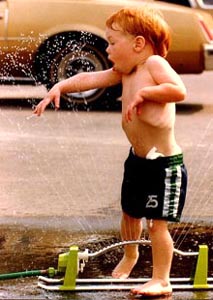
One of the best ways to photograph young kids is to catch them in action when they're doing something that engrosses them — like playing with their toys ...or pretending at the piano...or timidly wading in the pool for the first time ...or holding a pet.
In addition to their fascination with the world around them, you can also catch them playing grownup. Don't forget to get them on their first day going to school — you want to preserve this moment forever...from their point of view and from yours.

And if your child's world of make-believe involves costumes and disguises, like this, take advantage and get them down on film. What makes this picture of the "policeman" so appealing? Of course, the costume, the makeup, and the silly look all contribute. But notice something else. Notice how this picture meets the NYI Three Guidelines: The subject is obvious. We've drawn attention to our subject by getting in close — real close! — and making him the only thing we see. And we've simplified because there's nothing in the frame that distracts our eye from his face and silly grin.
There are a number of points here.
First, don't be afraid to get in close. Usually, the closer the better. Just show enough to make the situation clear. In this case, we see the badge on his chest and on his hat. It's clear that he's dressed as a cop — at least, a circus cop!
Second, if your kid is a clown or a ham, go with it! He or she is probably going to grow into a shy teenager and self-conscious adult. Take advantage of this moment to capture the boy or girl's true spirit.

Third, don't forget to simplify. It's easy to get caught up by the wonderful expression or antics of your child, and overlook a lot of clutter in the background. Don't! Look around the viewfinder before you shoot. Look for distracting elements. Since your subject is probably near the center — and should fill the center, if possible — look around the edges of the frame. These are the areas we often overlook.
If you see anything distracting, try to eliminate it or camouflage it.
How can you eliminate distraction? First, move the camera a bit. See if the distraction disappears from the visible frame. Second, since you are often photographing from close up, try moving even closer. This will often eliminate the distraction and improve the picture. Third, don't overlook the possibility of walking over and removing the offending object. This is often the easiest solution.
What about camouflaging the distraction by throwing it out of focus? Consider using a very wide aperture to narrow the depth of field so that only your subject is in sharp focus. This works particularly well if you're really close to your subject.
When it comes to kids there's one more guideline: You never know what they'll do next, so expect the unexpected. Have your camera ready...and when you see the picture, SHOOT! With kids, you usually won't get a second chance.
Of course, young kids grow up and become older kids. Getting good pictures of them is different from photographing the young kid. Here's why:
By the time they're seven or eight, they've lost a lot of their childish innocence. They're going to become more difficult to photograph when they become teenagers, but the problem is beginning to appear. Most older kids are a little self-conscious in front of the camera. So you've got to relax them. How do you do that? It's easy!
Older kids still listen to adults. They are usually cooperative, and once you establish a relationship, they're out to please you.

When you're photographing one child, you can usually let him or her become engrossed in an activity. Then, you may be able to shoot without even drawing his or her attention.
A couple of hints:
First, try to avoid the use of strobe. You'll get a better picture in natural light, and you won't distract the child from whatever he or she is doing.
Second, try to avoid direct sunlight. If outdoors, look for what we call "open shade." This is an area that is lit by natural light, but is shaded by some object like a tree or a building or whatever. If indoors, try to get your subject into the lighted, but shaded, area near a window. In this case you may need a faster film. ISO 400 or higher will usually do.

So far we've talked about photographing one child. Lots of times you'll want to shoot two or more kids together. Whether it's a friend or a brother or sister, kids have a way of popping up when the camera comes out. The key when you're photographing two or more kids (or two or more adults, for that matter) is to show relationship between your subjects.
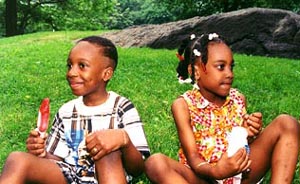
Look at these two kids. They're cute, they're brother and sister, but they're looking in opposite directions. There's NO relationship. They're off in their own different worlds. In an instance such as this, it's necessary to direct your subjects. Just ask them to look at you and smile. With any luck, you'll get some cooperation!
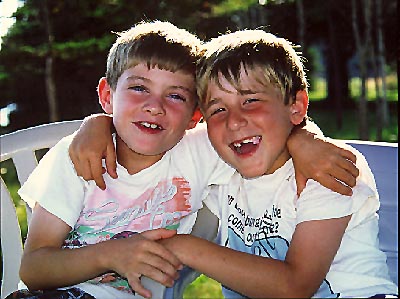
Now look at this picture of these two boys. We don't know if they're brothers, but they sure do relate to each other! We see it in the way their arms intertwine, their eyes look the same way, and the way they both seem to be enjoying the camaraderie of moment. Remember, the key to great photos of kids together is to show the relationship between them. This picture really captures that.
How do you show relationship? Let this picture be your guide. Get the kids close together. Try to get them in some charming physical contact. Get their eyes to look in the same direction. And, have them seem to share the same joy!
One more tip:
Kids spend a lot of time outdoors. When you photograph them outdoors, you really have to watch the lighting since you can't control it all. In this picture of the two boys, how was it lit? From the halo of light in their hair, we can figure that the sun was overhead, somewhat behind them. In this position, their faces were shaded from the sun! If Eric Johnson had allowed his camera to "read" the light in auto-exposure, it might well have underexposed their faces. But he knew better than this. He added light to their faces by using fill flash. The fill-flash setting of his strobe or camera added light to their faces and made this great shot possible.
So what's the tip? We advise that you use your strobe to add light in every picture you shoot outdoors. We know that this seems to contradict the statement we made earlier, which said not to use strobe. What we meant there was not to use strobe as your primary source of light. We are suggesting that you simply use your strobe outdoors to add light. So check your camera and strobe to see if it has a "fill-flash" setting, and use it!
So these are the important things to remember when you shoot pictures of kids:
- First, follow the Three NYI Guidelines;
- Second, let young kids be themselves...just be ready for the unexpectedly wonderful moment;
- Third, let older kids become engrossed in what they're doing, and try to photograph them without their becoming self-conscious;
- Fourth, when you photograph kids together, show relationship;
- Fifth, when you photograph kids outdoors, use fill-flash.


