

NYIP Graduate and Student Advisor Chris Corradino has an active business photographing sports and news stories in the metropolitan New York area. Like many photographers, he also is very serious about outdoor photography when he travels. We hadn't seen that much of Chris's landscape work, but when we saw the beautiful photographs that illustrate this article, we asked him to write about his approach and share some tips with our readers.
When one thinks of great landscape photography, names like Ansel Adams, Galen Rowell, and Art Wolfe come to mind. Yet, you too can make breathtaking photos of the natural world by utilizing some common tricks of the trade! This article focuses on several specific areas that will have an immediate impact on your photography.
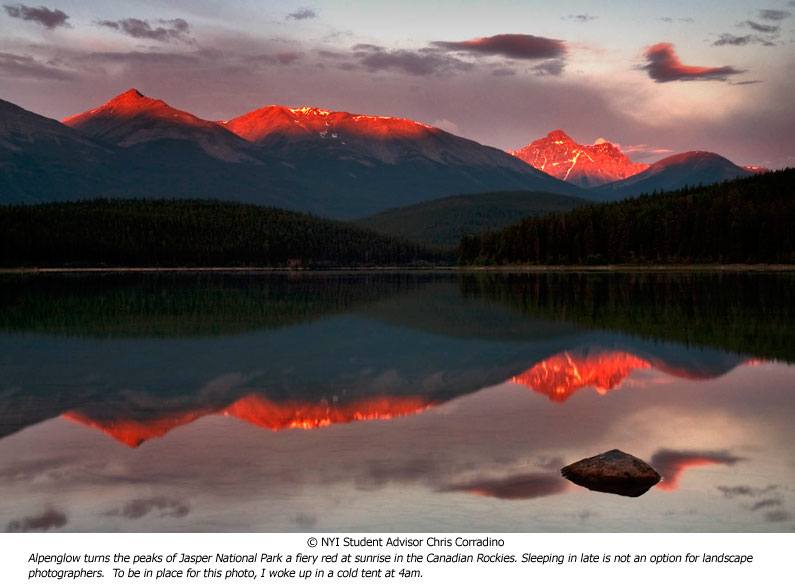
Time of Day: If you hang around with photographers long enough, you will inevitably hear the phrase "the magic hour". This refers to the early morning and late evening, when most dramatic landscape photos are made. To put yourself in the right place at the right time, start by bookmarking a local website that provides sunrise and sunset times. I use this one from the Navy Oceanography Portal. Just enter the specific date of your shoot, and the appropriate city and state. Your efforts will be rewarded with the warm tones created from the low angle of the sun. In addition, you'll also notice an increase in color saturation. Since most birds and animals are more active before bedding down for the day, you may be able to incorporate them into your scene. Best of all, you can focus on your craft without the distracting busloads of tourists typical of mid-day travel.
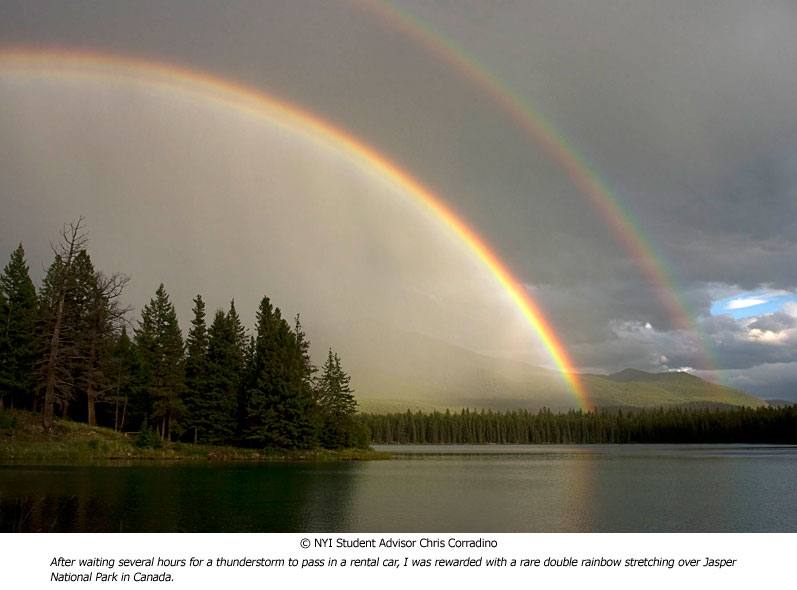
Weather: Rainbows, lightning, ominous clouds, fog, and snow can all add considerable impact to your landscapes. In order to capture these natural phenomena, a photographer must seek out weather patterns that are less than ideal. By making yourself aware of the upcoming conditions, you can begin to plan and visualize your photos in advance. For example, perhaps your favorite lighthouse will look even better with freshly fallen snow and an overcast sky. Maybe that old grave yard will take on a more pensive feel in a thick morning fog. Here in New York City, people's reactions to rain can create interesting photographic opportunities. Regardless of where you live, it's important to consider the moods that various weather conditions can bring to a scene. Once you begin to work with the natural elements, the possibilities are endless. If you're concerned about getting the camera wet, try using a hotel shower cap to keep it dry. In the mountains, weather can change quickly so it's best to be prepared for anything.
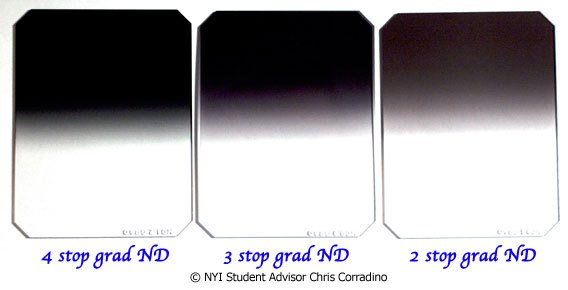
Filters:Two words, Neutral Density. It surpasses the Polarizer as the most useful filter landscape photographers can keep in their bag. These great little tools come in many shapes, strengths, and sizes. For the most versatility, I recommend the square types that fit in a lens mount. Cokin makes inexpensive holders that work well with other brand's filters such as Hitech. Generally, a soft edge two stop neutral density filter is a good place to start. It works by reducing the difference in brightness between the foreground and the sky. This allows your digital sensor to capture the detail in both areas. For example, if you meter the foreground and expose it as 18% grey, the bright sky may be overexposed by two stops. A two stop ND filter would correct this by holding back two stops of light from the sky. With this technique, you can exceed your camera's dynamic range. Filters in the three- and four-stop range are also quite effective and worth keeping in your bag. The soft edge variation is much easier to blend naturally whereas the hard edge is preferable for seascapes with a definitive horizon line. To pick up an ND filter, check out www.2filter.com.
While the aforementioned ND filters are a necessity for any serious landscape artist, be cautious when considering the purchase of a UV filter. Generally these filters don't provide much impact, and can in fact reduce the ultimate image quality. Some photographers use them as a protective measure, and camera stores push them for this reason. Yet, for landscapes they are normally not necessary. A Circular Polarizer however, is a very handy tool for increasing saturation, and eliminating reflections on water and other surfaces. By rotating the filter while looking through the viewfinder, you can actually see the change a Polarizer has on the scene. The effectiveness of the polarization is dependent upon the angle of the sun in relation to your lens. For this reason, polarizing filters should not be left on the lens at all times. Also, be aware that using a Polarizing filter reduces the amount of light reaching the sensor by as much as two stops when you use it to its maximum effect.

Camera Features: Many of today's DSLRs have a feature called "Mirror Lock Up". It is great tool to help you make sure your images are tack sharp. It works by locking the SLR mirror in the up position, and allowing the vibrations to stop before the shutter is fired. By using mirror lock up, along with a sturdy tripod, your enlargements will be sharp, and ready for hanging on a gallery wall. Another useful feature of newer DSLR'S is a "Noise Reduction Mode" which reduces the digital noise typically found in long exposures and low light conditions. However, noise reduction can be applied with more control in the digital darkroom, often with superior results. Popular software like Neat Image, Noise Ninja, and Noiseware usually offer free trial periods. Before purchasing one, give it a test run to see what works best for you.
One commonly overlooked feature that can't be duplicated in the darkroom is the "Depth of Field Preview". This useful button allows you to actually see what will be sharp, and what will blur prior to taking the image. For landscape photographers, this is an invaluable tool to help create an image of a scene as you want it to appear. Does F/8 render the entire scene as relatively sharp, or should you try F/11 or F/16? The Depth of Field preview can help answer these questions while you are out in the field.
The spot meter is a powerful tool for fine tuning your exposure. To use it, start by putting your camera into the manual exposure mode. Next, change your metering mode to spot. If your camera doesn't have a spot metering mode, use the partial meter mode. In the viewfinder you should see something that looks like this: (-2...-1...0...+1...+2) If you want to make the sand on the beach look black, take a meter reading of the sand, and adjust your exposure to read at -2. Likewise, if you want to show the snow as truly white, take a meter reading off the snow and adjust your exposure to read as +1.5 or +2. This is accomplished by changing the f-stop, shutter speed, ISO, or a combination of all three. With digital cameras, it's often best to make a reading of the brightest part of the image as digital sensors are more sensitive to highlights than film was. It takes some experimenting to get the hang of this system. Thankfully your digital camera will provide instant results, and you can make adjustments as you go.
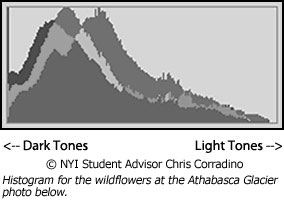
Don't forget to utilize the histogram here as well. It only takes a second to determine if your shadows are too dark, or highlights are overexposed.
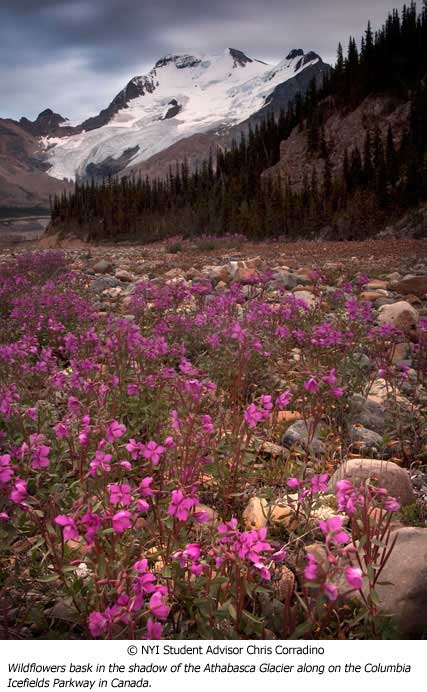
Composition:Ansel Adams said "There are no rules for good photographs, there are only good photographs." This is important to remember when considering your composition. Sure the rule of thirds is helpful, but it's not meant to be the only way to photograph a scene. The key is to explore all the possibilities and compose with your feet. Before putting the camera on the tripod, bring it to your eye and make some decisions about how you want the picture to look. Does the horizon line look better at the bottom or the top of the frame? How about the middle? Also, consider what you would like to include in the foreground. Does the overall mood of the photo change from various vantage points? I know it's tempting to include everything in one frame when surrounded by natural beauty, but try to avoid falling into this common trap. Instead, determine what is most important in the landscape and work to emphasize it by leaving out unnecessary elements. For example, if you have a field of wildflowers and a plain blue sky, you may opt to put your horizon line in the upper third of the frame, such as in this photo I took at the Athabasca Glacier along on the Columbia Icefields Parkway in Canada. (Hear the full story behind the photo here.) Not only will this emphasize the flowers, but it will de-emphasize the sky. Get down as far as you can and explore the perspective from ground level. Only after you find a composition that you like should the tripod be introduced. By experimenting this way, you are creating a different interpretation of the scene and giving it your own artistic touch. Instead of just taking the photo, your goal is to make the photo.
Post Processing:There is an ongoing debate amongst many photographers. What's the preferred file type, RAW, DNG, TIFF, or JPEG? If you break the process down into 4 areas, each one of these files has a valid, useful purpose.
Capture Mode:For landscape photography RAW is the ideal capture format as it gives the photographer more control over the image in the digital darkroom. By simply changing the white balance you can make an immediate impact on the overall look of the photo. For instance, by choosing a white balance setting of cloudy, or shady, your photo will take on a warmer tone.
For Archival Purposes:The DNG format was recently created by Adobe in an effort to unify the various RAW formats created by different camera manufactures. If your software has the ability to save a file as a DNG, it is worthy of consideration. Yet, at this point in time, both RAW and DNG are acceptable archival methods for your digital negatives.
For Making Prints:By saving your completed image as a TIFF, you are using a lossless file which is capable of producing high quality enlargements.
For Email and Web Posting:A compressed JPEG saved at 72 DPI and under 100KB allows for quick web viewing, and email transmission.
Final Thoughts:Through the efforts of the determined landscape photographers that came before us, an enormous amount of land has been conserved for future generations to enjoy. However, there is still work to be done, and your photographs can help to make the difference. The easiest way to begin is to get outdoors with your camera often. Why not start right now. After all, it's been said that the longest journey begins with a single step. I'll see you out on the trail!


