

If you’re looking for an interesting photography project to try this weekend, photographing a starburst effect is a fun experiment.
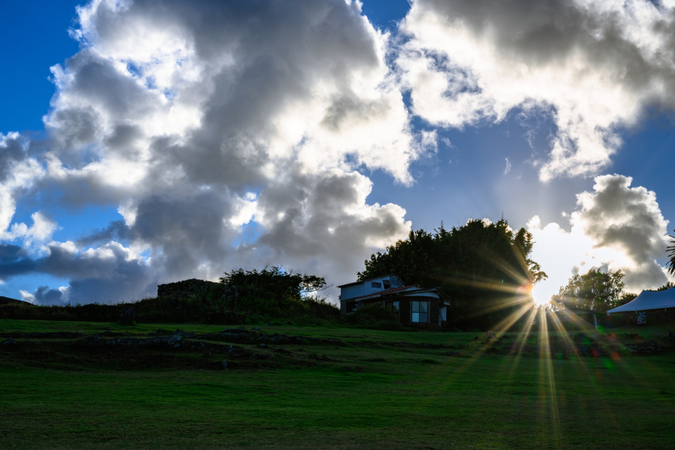
If you’ve never heard of this before, it’s pretty straightforward. If you simply shoot directly into the sun, you are able to create a unique “starburst” look as a result of pointing your lens at an extremely bright light source. As you can see in the example above, the resulting shot will likely look like a star shape radiating around the light source, rather than a single bright spot at the source itself.
How To Photograph a Starburst Effect.
For one, you won’t be able to achieve a starburst like the one pictured above if you are working with your aperture at its widest possible setting. This is because, at its widest setting, the aperture’s diaphragm is shaped like a perfect circle. This circular shape will disrupt the like diffraction which causes that starburst look. If your aperture is smaller, you can stop down your lens, and the diaphragm within your camera will form a polygon shape - this is what winds up turning that light into a burst.
What Aperture Should I Use for Starburst Photography?
Getting started, try using a small aperture setting no larger than f/11. If necessary, you can go even smaller as you check out your results and achieve the burst look you’re going for- something as small as f/22 could also work. It’s going to depend on your environment and the strength of the sunlight you’re photographing. Start with f/11 and adjust accordingly.
The Sun Looks Way Too Bright in My Photos. How Should I Adjust?
You need to reduce lens flare. A simple way to do this is by partially blocking the sun. Depending on your surroundings, you could use something else in a given landscape to do this. If you refer to the example image above once again, you can see that the artist may have partially hidden the sun with just a small bit of the trees below. This is a great technique for working around sunlight that’s just a bit too harsh.
Still Not Getting It?
If you find yourself attempting more advanced photography techniques such as this one to no avail, consider enrolling in a more formal photography class to better sharpen your skills. In an online course like NYIP’s, you will walk through photography tutorials such as this one in much greater detail- watching tutorials of professional photographers as they show you step by step how they capture these images themselves.
You will read lessons, watch videos, and then when it comes time to complete your photo projects to put these lessons to the test, you’ll have the ability to phone your mentor, a professional NYC-based photographer, if you run into any issues. If you’re interested in getting started, call 1 800-583-1736 for all the information you need to dive in.


